Prep Time: 45 minutes | Cook Time: 1 hour 30 minutes | Chill Time: 8 hours (minimum) | Total Time: 10 hours 15 minutes
Skill Level: Intermediate | Yield: 12 generous slices
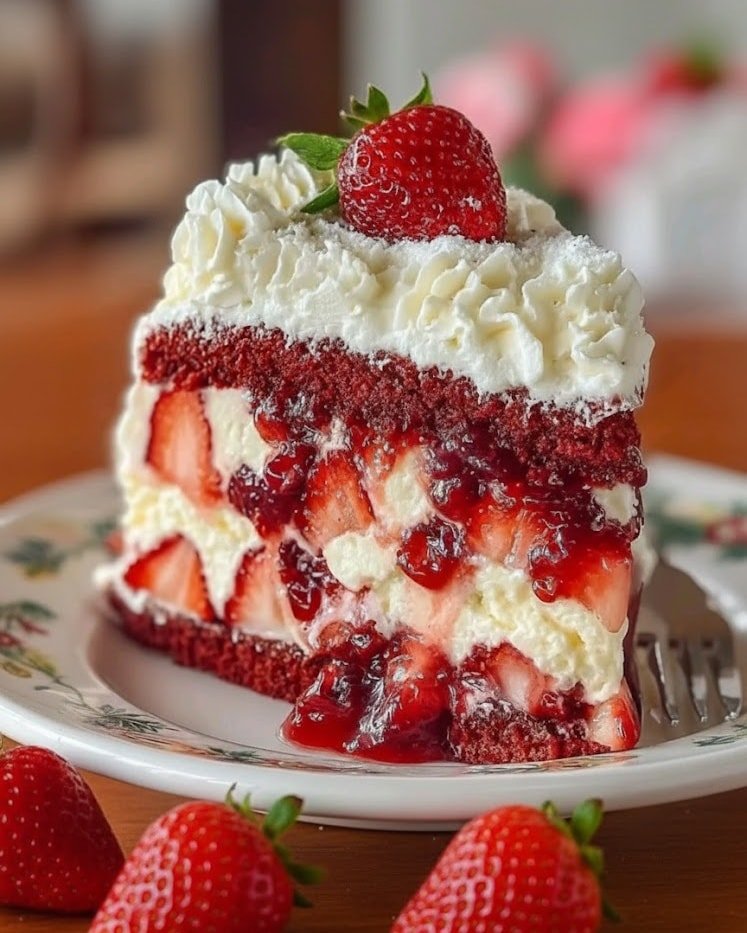
A breathtaking centerpiece dessert that marries the iconic flavors of red velvet cake with the creamy luxury of New York-style cheesecake, all crowned with a glistening layer of fresh strawberry topping. This stunning layered cheesecake features a moist, cocoa-kissed red velvet base, a supremely smooth and tangy cream cheese filling, and a vibrant, homemade strawberry glaze bursting with real fruit flavor. Perfect for celebrations, Valentine’s Day, or when you simply want to bake a show-stopping treat.
Ingredients
For the Red Velvet Layer:
-
1 ½ cups (190g) all-purpose flour
-
1 cup (200g) granulated sugar
-
1 tsp baking soda
-
1 tsp unsweetened cocoa powder
-
½ tsp fine sea salt
-
¾ cup (180ml) vegetable oil
-
¾ cup (180ml) buttermilk, room temperature
-
1 large egg, room temperature
-
1 tbsp (15ml) red liquid food coloring (or 2 tsp gel coloring)
-
1 tsp pure vanilla extract
-
1 tsp white vinegar
For the Cheesecake Layer:
-
32 oz (905g) full-fat cream cheese, softened to room temperature
-
1 ¼ cups (250g) granulated sugar
-
½ cup (120ml) full-fat sour cream, room temperature
-
¼ cup (60ml) heavy cream, room temperature
-
4 large eggs, room temperature
-
1 tbsp pure vanilla extract
-
1 tbsp all-purpose flour (for stability)
For the Fresh Strawberry Topping:
-
1 lb (450g) fresh strawberries, hulled and diced
-
⅓ cup (67g) granulated sugar
-
1 tbsp fresh lemon juice
-
2 tsp cornstarch mixed with 1 tbsp cool water (slurry)
For Garnish (Optional):
-
Additional whole strawberries
-
White chocolate shavings
-
Mint leaves
Instructions
Step 1: Prepare the Red Velvet Base
-
Preheat your oven to 350°F (175°C). Generously grease the bottom and sides of a 9-inch springform pan. For extra security against leaks, wrap the outside bottom and sides of the pan with two layers of heavy-duty aluminum foil.
-
In a medium bowl, whisk together the flour, sugar, baking soda, cocoa powder, and salt.
-
In a large bowl, whisk together the oil, buttermilk, egg, food coloring, vanilla, and vinegar until smooth and uniformly red.
-
Gradually add the dry ingredients to the wet ingredients, mixing just until combined. Do not overmix.
-
Pour the red velvet batter into the prepared springform pan, smoothing it into an even layer. It will be a thin layer. Bake for 20-25 minutes, or until the center springs back lightly when touched. Remove from the oven and let it cool in the pan on a wire rack while you prepare the cheesecake filling. Do not turn the oven off.
Step 2: Make the Cheesecake Filling & Assemble
-
Reduce the oven temperature to 325°F (160°C).
-
In the bowl of a stand mixer fitted with the paddle attachment (or using a hand mixer), beat the softened cream cheese on medium-low speed until completely smooth and creamy, about 2-3 minutes. Scrape down the bowl frequently.
-
Add the sugar and beat on low until fully incorporated. Scrape the bowl again.
-
Mix in the sour cream, heavy cream, and vanilla extract on low speed until just combined.
-
Beat in the eggs one at a time, mixing on low speed after each addition until just barely blended. After adding the last egg, add the tablespoon of flour. Mix until the filling is uniform, but stop immediately once it’s smooth. Overmixing incorporates too much air, which can cause cracking.
-
Slowly pour the cheesecake batter over the completely cooled red velvet base. Tap the pan gently on the counter to release any large air bubbles.
-
Place the springform pan inside a large roasting pan. Carefully pour hot water into the roasting pan until it comes about halfway up the sides of the springform pan, creating a water bath (bain-marie).
Step 3: Bake and Cool Slowly
-
Carefully transfer the roasting pan to the oven. Bake at 325°F for 65-75 minutes. The cheesecake is done when the edges are set but the center still has a slight, gentle jiggle (like Jell-O) when the pan is nudged. The center temperature should read about 150°F (65°C).
-
Turn off the oven, crack the oven door open with a wooden spoon, and let the cheesecake cool inside the turned-off oven for 1 hour. This gradual cooling is the best defense against cracking.
-
Remove the cheesecake from the water bath and carefully peel away the foil. Run a thin knife or offset spatula around the edge of the pan to loosen it from the sides. Let it cool completely on the wire rack for another 2 hours.
-
Once at room temperature, loosely cover the top of the pan with plastic wrap and refrigerate for at least 8 hours, preferably overnight.
Step 4: Prepare the Strawberry Topping
-
About 1-2 hours before serving, make the topping. In a medium saucepan over medium heat, combine the diced strawberries, sugar, and lemon juice. Cook, stirring occasionally, until the berries release their juices and the sugar dissolves, about 5-7 minutes.
-
Bring the mixture to a simmer. Stir the cornstarch slurry and add it to the simmering strawberries. Cook, stirring constantly, for 1-2 minutes until the mixture thickens and becomes glossy.
-
Remove from heat and let the topping cool completely to room temperature before spreading it over the chilled cheesecake. This prevents the topping from “bleeding” into the filling.
Step 5: Final Assembly & Serve
-
Remove the chilled cheesecake from the refrigerator. Unlatch and carefully remove the springform ring.
-
Spread the cooled strawberry topping evenly over the surface of the cheesecake.
-
Garnish with whole strawberries, white chocolate shavings, and mint leaves, if desired.
-
For the cleanest slices, use a sharp, thin-bladed knife dipped in hot water and wiped dry between each cut. Serve chilled.
Chef’s Notes & Tips for Success:
-
Room Temperature is Key: Ensure all dairy ingredients (cream cheese, sour cream, eggs) are truly at room temperature. This prevents a lumpy filling and ensures a silky-smooth texture.
-
Prevent Cracks: The water bath and slow, gradual cooling are your best friends. Avoid opening the oven door during baking. Don’t overmix the batter or overbake.
-
Make Ahead: This cheesecake tastes even better on the second day. You can prepare and refrigerate the entire cake (without the strawberry topping) up to 2 days in advance. Add the topping 1-2 hours before serving.
-
Storage: Store covered in the refrigerator for up to 5 days. The strawberry topping is best consumed within 2-3 days.
Nutritional Information (Per slice, approximate):
-
Calories: ~680 kcal
-
Total Fat: 46g
-
Saturated Fat: 20g
-
Cholesterol: 165mg
-
Sodium: 420mg
-
Total Carbohydrates: 60g
-
Dietary Fiber: 1g
-
Sugars: 46g
-
Protein: 10g