Prep Time: 20 minutes | Cook Time: 15 minutes | Chill Time: 1 hour | Total Time: 1 hour 35 minutes
Difficulty: Intermediate | Servings: 12 bars
Introduction
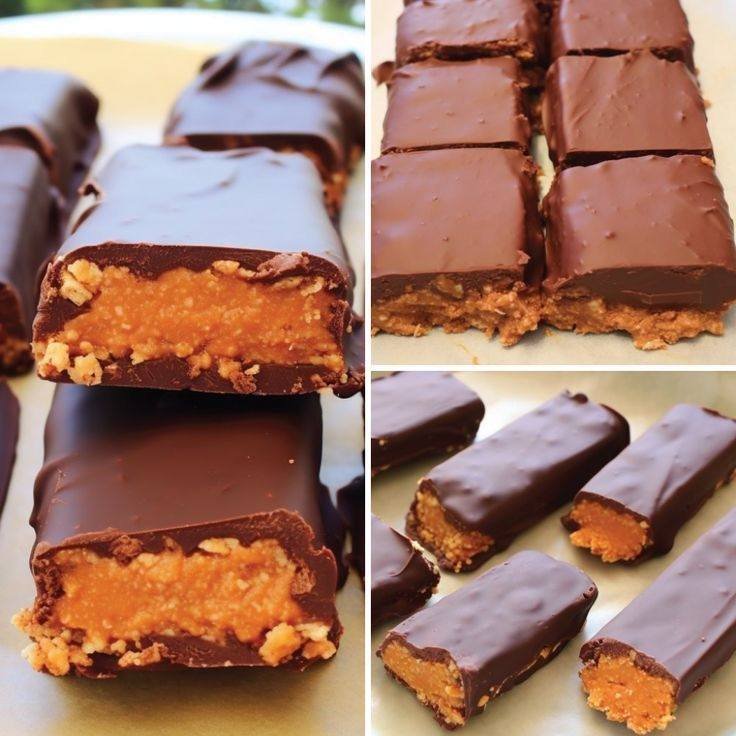
Craving the iconic, crispy, peanut buttery crunch of a Butterfinger but committed to a low-carb lifestyle? This Keto Butterfinger Candy Bar recipe is your golden ticket. We’ve deconstructed the classic and rebuilt it with keto-friendly ingredients, resulting in a shockingly accurate copycat that’s sugar-free, gluten-free, and utterly irresistible. A crispy, flaky peanut butter center is enrobed in a silky-smooth layer of rich, sugar-free chocolate. It’s a perfect treat for satisfying sweet cravings without derailing your macros.
Nutritional Information (Per Bar)
| Nutrient | Amount |
|---|---|
| Calories | 178 kcal |
| Fat | 16g |
| Saturated Fat | 6g |
| Carbohydrates | 6g |
| Net Carbs | 3g |
| Fiber | 3g |
| Protein | 5g |
| Sugar | 1g (Erythritol) |
Note: Nutritional information is an estimate and may vary based on specific ingredient brands used.
Equipment Needed
-
Medium saucepan
-
Heatproof bowl (for double boiler) or microwave-safe bowl
-
8×8 inch baking dish
-
Parchment paper
-
Mixing bowls
-
Whisk and spatula
-
Small sharp knife
Ingredients
For the Crispy Peanut Butter Layer:
-
1 cup smooth, no-sugar-added peanut butter
-
⅓ cup powdered erythritol (like Swerve Confectioners)
-
3 tablespoons unsalted butter
-
1 teaspoon vanilla extract
-
½ teaspoon salt
-
1 ½ cups pork rind panko OR ultra-fine almond flour (see Chef’s Note)
For the Chocolate Coating:
-
1 ½ cups sugar-free dark chocolate chips (Lily’s or similar, at least 70% cocoa)
-
1 tablespoon coconut oil or cacao butter
Optional Garnish:
-
Flaky sea salt for sprinkling
Instructions
Step 1: Prepare the Pan
Line an 8×8 inch baking dish with parchment paper, leaving some overhang on two sides. This “sling” will make it easy to lift out the set candy. Lightly grease the paper with a dab of butter or coconut oil.
Step 2: Create the Crispy Center (The “Filling”)
-
In a medium saucepan over low heat, combine the peanut butter, powdered erythritol, and butter. Heat gently, stirring constantly, until the mixture is completely smooth and well combined, about 3-5 minutes. Do not let it boil.
-
Remove from heat and stir in the vanilla extract and salt.
-
Here’s the key to the texture: Gradually add your chosen crispy element—pork rind panko for the most authentic, airy crunch, or ultra-fine almond flour for a nuttier, still-crispy texture. Stir vigorously until the mixture is fully incorporated and begins to pull away from the sides of the pan. It will be thick and look a bit like a crumbly, shiny dough.
-
Immediately transfer the mixture to the prepared baking dish. Using the back of a spatula or your hands (lightly oiled), press it firmly and evenly into the pan. You want a compact, uniform layer. The harder you press, the better the bars will hold together.
Step 3: Chill the Base
Place the pan in the refrigerator for at least 30 minutes to allow the layer to set and become firm.
Step 4: Cut into Bars
Once fully chilled, use the parchment paper to lift the entire slab out of the dish. Place it on a cutting board. Using a sharp knife, cut it into 12 rectangular bars (cut in half, then each half into six bars). For clean cuts, wipe the knife with a warm, damp cloth between slices. Place the bars on a parchment-lined tray and return to the fridge.
Step 5: Temper the Chocolate Coating
-
Create a double boiler by placing a heatproof bowl over a saucepan with 1 inch of simmering water (ensure the bottom of the bowl doesn’t touch the water). Add the chocolate chips and coconut oil.
-
Stir gently and constantly until the chocolate is completely melted, smooth, and glossy. This should take about 5-7 minutes. Alternatively, melt in a microwave-safe bowl in 30-second bursts, stirring well between each.
-
Remove from heat and let the chocolate cool slightly for 2-3 minutes.
Step 6: Enrobe the Bars
-
Remove the peanut butter bars from the fridge. Using a fork or dipping tools, dip each bar one at a time into the melted chocolate, ensuring it’s completely covered.
-
Lift it out, let the excess chocolate drip off, and place it back on the parchment-lined tray.
-
Immediately sprinkle with a pinch of flaky sea salt, if desired.
-
Repeat with all bars. For a thicker coating, you can use a spoon or spatula to help cover the sides and top.
Step 7: Final Set
Return the tray to the refrigerator for at least 30 minutes, or until the chocolate shell is completely hard and set.
Chef’s Notes & Tips for Success
-
The Crunch Factor: Pork rind panko is the secret weapon for a near-identical texture to the original candy. It’s neutral in flavor once mixed and provides an incredible, airy crisp. If you prefer not to use it, ultra-fine almond flour works beautifully but yields a denser, more shortbread-like crunch.
-
Sweetener Swap: You can use other powdered keto sweeteners like monk fruit or allulose. Avoid granular sweeteners, as they won’t dissolve properly and will make the filling gritty.
-
Chocolate Choice: Quality matters. Use a brand of sugar-free chocolate chips you enjoy eating on its own. Adding the coconut oil or cacao butter thins the chocolate slightly, making it easier to dip and creating a smoother, snappier shell.
-
Storage: Store finished Keto Butterfinger bars in an airtight container in the refrigerator for up to 2 weeks. They can also be frozen for up to 3 months. Let them sit at room temperature for 5 minutes before eating for the best texture and flavor.
-
Allergy-Friendly Option: For a nut-free version, substitute sunflower seed butter for the peanut butter. Be aware it may react with the sweetener and turn the filling slightly green (harmless but surprising!).
Serving Suggestions
Enjoy these bars straight from the fridge for a satisfying, cold snap. They are perfect as a standalone dessert, crumbled over keto ice cream, or packed as a lunchbox treat. Pair with a cup of black coffee or unsweetened almond milk to balance the richness.
Indulge without compromise. This recipe proves that you don’t have to give up the nostalgic flavors you love. With its perfect balance of salty, sweet, and supremely crunchy, this Keto Butterfinger will become a staple in your low-carb treat repertoire.